Send Test Messages
You can send a test Message to specified recipient, a pre-defined list of test recipients or selected Contacts. This gives you the opportunity to review the content exactly as it will appear to a targeted Contact.
There are three different modes that you can use for testing a Message:
- Standard sends a draft of a Message to a list of specified recipients. The recipients can be specified using a combination of a test a list and manually entering a list addresses.
The Message will be personalized for one specified Contact - and that Contact's data will be used for any fields that have been inserted into the content of the Message.
This is the mode that you will use most often, as most messages don't include conditional sections.
- Multiple Variants sends multiple drafts of a Message to a list of specified recipients. The recipients can be specified using a combination of a test a list and manually entering a list addresses.
The Message will be personalized for multiple specified Contacts - one Message will be sent for each Contact, and that Contact's data will be used for any fields that have been inserted into the content of the Message.
Use this mode when you want to test variable content that includes conditional sections for different contact groups. By sending a message personalised for one contact in each segment you can view all possible combinations.
- Contact Recipient Variants sends a draft of a Message to a list of specified Contacts. The Message will be personalized for each Contact and will emulate a real Message for that Contact.
- Use this mode when all the recipients exist in the database and would like to view the message personalized for themselves.
You specify either email addresses or mobile numbers depending on the type of Message that is being tested.
Unlike Message posting where Messages are queued for at least five minutes, a test Message will be sent immediately.
Similar to previewing the Message, it is recommended that you send a test Message for a cross-section of Contacts and Message formats, particularly where the Message has been personalized for various criteria. The Multiple Variants test mode is a convenient way to do this.
When you send a test Message this emulates a real Message for the Contact specified. This means that the Message will use real headers and real links and so caution must be taken not to unintentionally update any details or unsubscribe the Contact.
In This Section |
See Also |
Standard Test Mode
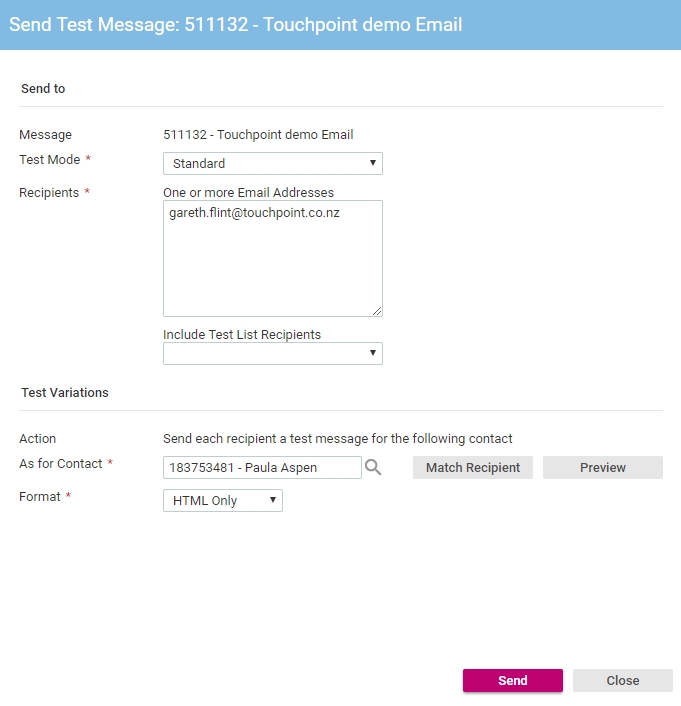
The Standard Test Mode sends each specified recipient a test Message for the specified Contact.
To send a Standard test Message
- From the Message Component window View Bar, click Summary.
- From the Summary view, click the Test button.
- The Send Test Message dialog will be loaded.
- From the Test Mode list click Standard.

- In the Recipients fields specify the recipients the test Messages will be sent to.
You can include a combination of manually entered addresses (or mobile numbers) in the text box and recipients from a test List.
If the number of test Messages is greater than thirty, only the first thirty will be sent.
- As for Contact defines which Contact's data will be used for any fields that have been inserted into the content of the Message. If you wish to change the selected Contact, click the Contact Selector
 button and select the Contact.
 - Click the Send button to send the test Messages.
You can use the Match Recipient button to automatically populate the As for Contact field.
The specified recipients' addresses will be searched for in the partition. If a Contact with matching details is found, that Contact will be used as the As for Contact. If there is more than one match, the first match found will be used.
Multiple Variants Test Mode
The Multiple Variants Test Mode sends each specified recipient a test Message for each specified Contact.
To send a Multiple Variants test Message
- From the Message Component window View Bar, click Summary.
- From the Summary view, click the Test button.
- The Send Test Message dialog will be loaded.
- From the Test Mode list click Multiple Variants.
- The Test Message dialog will be reloaded.
- In the Recipients fields specify the recipients the test Messages will be sent to.
You can include a combination of manually entered addresses (or mobile numbers) in the text box and recipients from a test List.
If the number of test Messages is greater than thirty, only the first thirty will be sent.
- As for Contact defines which Contacts' data will be used for any fields that have been inserted into the content of the Message.
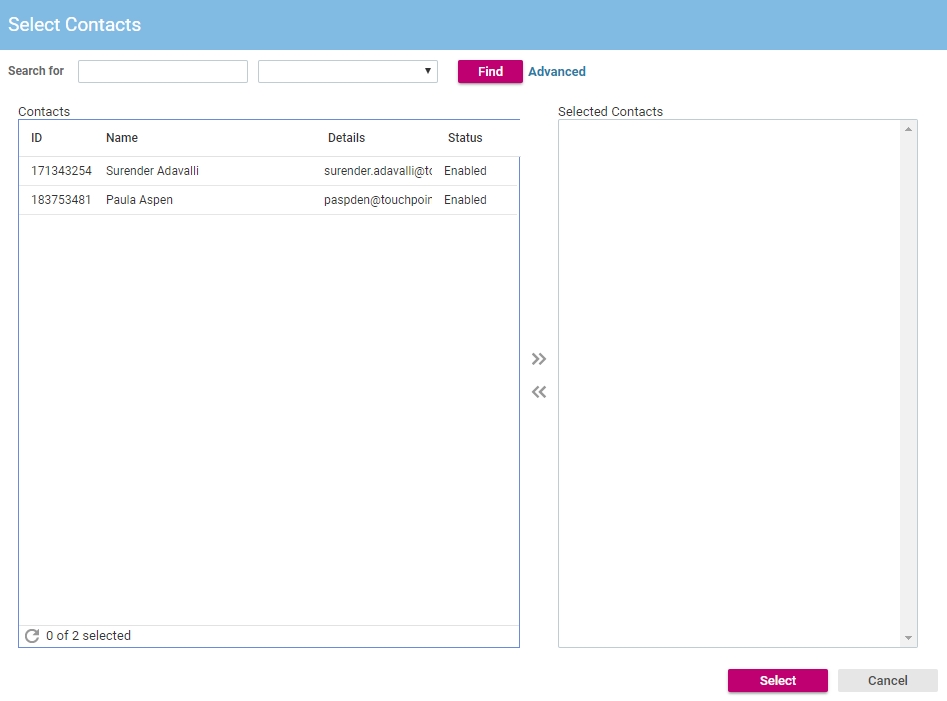
To add Contacts to the list, click the Add button from the Action bar to display the Select Contacts dialog.

Using the Select Contacts dialog you can specify multiple Contacts to use. From the advanced search panel you can filter the displayed Contacts based on a Filter or List. This can be useful if you want to send to the same group Contacts on more than one occasion.
A test Message will be sent to each recipient for each Contact selected.
- Click the Send button to send the test Messages.
When sending test email Messages the default is to send both HTML and text format emails - One of each format will be sent to each recipient. This is normally the best option unless the Message will be posted in only one format.
This means, for example, that if there are five As For Contact specified, each recipient will receive ten test emails.
Contact Recipient Variants Test Mode
The Contact Recipient Variants Test Mode sends each recipient Contact a test Message personalized for themselves.
To send a Contact Recipient Variants test Message
- From the Message Component window View Bar, click Summary.
- From the Summary view, click the Test button.
- The Send Test Message dialog will be loaded.
- From the Test Mode list click Multiple Variants.
- The Test Message dialog will be reloaded.
- The Recipients Component List allows you to define which Contacts will be sent the test Message.
To add Contacts to the list, click the Add button from the Action bar to display the Select Contacts dialog.
Using the Select Contacts dialog you can specify multiple Contacts to use.
- Click the Send button to send the test Messages.
Specified Contact's must have a valid contact address, for example, email address.
Only the first thirty specified Contacts with valid addresses will be sent test Messages.